


If your existing floor appears worn or tired, your first instinct may be to contact a contractor and replace it. You may be tempted to install carpet just over top. Renting the equipment to refinish your floor and have it look brand new can cost you a fraction of what it would cost to replace the floor or cover it with carpet. A floor polisher or stripper is a useful tool for restoration of waxed floors. Similarly, carpeting that is professionally steam cleaned will smell and look as fresh as the day it was installed.
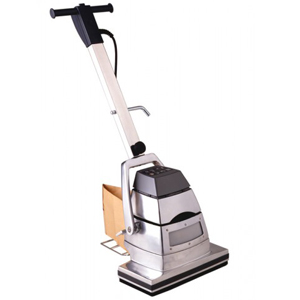
The greatest opportunity for saving, however, comes from renting the equipment to refinish your hardwood floors. We offer everything from orbital sanders, drum sanders, and sanding belts and pads for rent. It is usually a job that can be accomplished by most willing DIYers in a weekend, depending on the size of the project and the amount of refinishing required. You can make floor sanding a little easier by following these tips:
- Test your floor with water to determine how much work needs to be done. It might be possible to get by with just a thorough cleaning and polishing if water beads or soaks in slowly. Depending on how much water remains in the surface, it may need to be refinished.
- To prepare for sanding, everything should be removed from the room including wall hangings, curtains and blinds. Ensure that everything is off the floor in the entire area.
- Sand the floor after it has been thoroughly swept and vacuumed. A pebble, staple or nail lying around can cause gouges in the wood after it has been sanded.
- Make sure floorboards are thoroughly examined and any nail heads are countersunk to at least 1/8 inch. You don’t want to remove more than necessary from the wood floor’s surface.

- Depending on your objective, you may not need to begin with very coarse paper if you only intend to sand out small scratches and blemishes. Sand lightly with 80 grit paper as a starting point. If you need to remove a layer of paint, you might want to start with 20 grit sandpaper. It is recommended that you begin removing old varnish with 36 grit sandpaper. Remember that you will need to make at least two more passes with progressively finer papers, ending with at least a 120 grit paper.
- The center of a room should be the first place you sand with a drum sander. While sanding from side to side of the room, make sure you follow the grain of the wood and use a smooth, continuous action. Ensure that each pass overlaps by a minimum of one inch. To sand the edges of the room, use an orbital sander.
- You should vacuum all the sawdust after you have finished, followed by wiping your floor with a tack cloth so it is completely clean. It is very important not to leave any debris behind after this step has been completed, because the debris will become permanently embedded in the polyurethane after the flooring is finished.
A rental company with experience can provide you with advice and knowledge on how to apply your floor finish. You tell us what you want accomplished with your project, and we can help you do that. More importantly, we know exactly what tools and materials you need in order to do the job right. Our experienced staff will direct you in the right direction for a floor finishing project, such as which types of sanders to use and which types of sandpaper to use. Visit our Rentalex Tampa store or contact our rental representatives by calling at (813)971-9990.
